Friday, October 18, 2013

SRM Replication Exact Status Check

SRM Replication Exact Status Check


Sometimes it is required to check exact replication status of VM. It becomes more important when incremental/delta replication is happening, because graphical interface doesn't show replication status.

Steps 1 – Check owner Host name for given VM from Summary TAB of vCenter.
Step 2 – Start SSH service on Host from Security Profile inside Host Configuration and Software.
Step 3 – Login to ESX host using proper login ID and password
Step 4 – Execute below given command to list all VMs, and note down the VMid for your VM.
# vim-cmd vmsvc/getallvms
Step 5 – Execute below given command to check exact replication status
# vim-cmd hbrsvc/vmreplica.getState 13
Step 6 – Execute below given command to check data transfer status.
# vim-cmd hbrsvc/vmreplica.queryReplicationState 13


Thanks
Thursday, October 17, 2013

Active Directory Bulk User Creation

Install the Active Directory Module for Windows PowerShell on a Member Server
1.       Log into a Windows 2008 R2 (or above) member server
2.       Launch PowerShell
3.       Enter Import-Module ServerManager 
4.       Enter Add-WindowsFeature RSAT-AD-PowerShell
5.       Enter Set-ExecutionPolicy Unrestricted
Install/Configure Active Directory User Creation Tool
1.       Log into a Windows 2008 R2 (or above) member server or a Windows 7 (or above) workstation
2.       Download the Active Directory User Creation Tool
3.       Right-click the downloaded file (ANUC.ps1) and choose Run With PowerShell
4.       When prompted, click Yes to create a new .XML file and click OK
5.       Edit the .XML file that appears, changing the  value to False
6.       Save and closet the .XML file
7.       Right-click ANUC.ps1 and choose Run With PowerShell
8.       Click File –> Create CSV Template and save the file as ImportUsersIntoAD.csv
9.       From a computer that has a .csv editor installed, edit ImportUsersIntoAD.csv
10.   Populate the user attributes, using the Windows Attributes Guide for reference and save changes   **The sAMAccountName and Password fields MUST be populated for the users will not be created
11.   Right-click ANUC.ps1 and choose Run With PowerShell
12.   Click File –> CSV Mode
13.   Click Import CSV, browse to the ImportUsersIntoAD.csv file and click Open 

14.   Click Submit All

Saturday, October 12, 2013

Extending Disk of Virtual Machine Enabled for Vsphere Replication


Extending Disk of Virtual Machine 
Enabled for vSphere Replication
  1.  Identify disk number which need to be extended. 
  2. Disable sphere replication for that particular disk.
  3. Edit Virutal Machine and extend the disk space as per requirement. 
  4. Note down the new size of disk e.g. 70G
  5. Login to ESX host at DR site using SSH (SSH has to be enabled.) 
  6. Locate virtual disk need to be extended inside respective datastore.
  7. Use this command to extend disk space.
    # vmkfstools -X 70G test-vm_1.vmdk
  8. Re-Enable replication and click yes when asked whether to existing disk.
  9. It will take some time for checksum and replication to complete.
Email : chandanji@gmail.com


Sunday, September 15, 2013

Exchange 2010 memory Capping

Exchange 2010 memory Capping

You will have tough time if exchange servers has high memory utilization. In exchange 2010 you have to modify both msExchESEParamCacheSizeMax and msExchESEParamCacheSizeMin value to get it working. Really that is the trick!!!


Update Note :- msExchESEParamCacheSizeMax effective effective only when msExchESEParamCacheSizeMin value is also configured. And Exchange Server 
restart is required after changes.

First of let us do calculation 

Exchange 2010: 4 GB = 4.194.304 KB / 32 KB => 131072

Define Min and Max Value 

Min – 1GB: msExchESEParamCacheSizeMin = 32768
Max – 4GB: msExchESEParamCacheSizeMax = 131072
You must adjust above given values to suit your server environment. 

Start -> ADSIedit.msc, or navigate to Start -> All Programs -> Administrative Tools -> ADSI Edit.

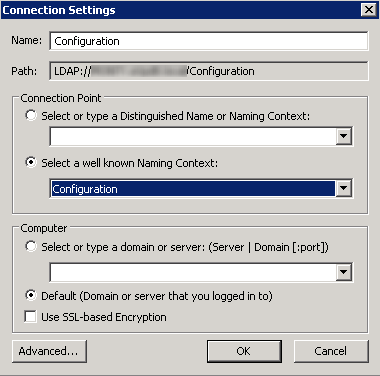
ADSI Edit -> Connect To

Then go to Configuration -> Services -> Microsoft Exchange -> ”Organization Name” -> Administrative Groups > ”Administrative Group” -> Servers -> ”Server Name” -> InformationStore


Then restart Information Store Service or restart exchange server if possible.