Saturday, January 30, 2016

CloudBerry Managed Backup Solution


CloudBerry Managed Backup Service (MBS) is built from the CloudBerry Backup technology and designed to meet the needs of Managed Backup Service, providing reliable backup with remote management and monitoring.


FEATURES FOR CUSTOMERS

  1. Cross platform backup: Windows, MAC, Linux.
  2. Cloud and local backup
  3. Scheduled and real-time backup
  4. Encryption and compression
  5. Block level backup
  6. System state backup and bare metal recovery
  7. MS SQL server backup
  8. MS Exchange backup
  9. Purge options
  10. Network locations backup
  11. Filtering and open files backup
  12. Step-by-step backup and restore wizard
  13. Bandwidth throttling And more...
    Contact us for customized backup Solution.

    • Add and Manage Users
      Create user accounts for your customers and invite them by email.
    • Manage and Monitor Backup Jobs
      Continuously monitor backup processes on the client machines, manage backup jobs, recover data and force software upgrades from the web control panel.
    • Define your own pricing
      Set pricing for your plans and packages
    • Multiple Cloud Storage Options
      Choose from multiple cloud storage options: Amazon S3, Amazon Glacier, Windows Azure, OpenStack and S3-compatible.
    • Manage Packages and Plans
      Create backup plans and assign them to users. Manage cloud storage packages for your users to set storage limits.
    • End-to-End Encryption
      Data is encrypted with AES 256-bit strong key before leaving the computer, in transit and in the cloud.
    • Integrate with RPCXML APIRebrand
      Rebrand everything from logos and images to email address and website link. Manage your rebranding through the web control panel.
    • Integrate CloudBerry Backup with your own applications.
    • Web Interface for Customers
      Provide your customers with online access to their backups.
    • Multiple Admin Accounts
      Create control panel sub accounts for your employees and assign to specific users or companies.
    • PSA/RMM Systems Integration
      Manage your customers' accounts, billing and ticketing from within ConnectWiseand Autotask PSA systems.
    • Sync and Share
      White-label CloudBerry Box is available for service providers.


      CloudBerry Backup

      Sunday, August 23, 2015

      Use Connectify to Save 3G/4G Cost


      Use Connectify to Save 3G/4G Cost

      Being a technical personal, I use gadgets a lot. But gadget requires internet connection and as you know Internet over 3G/4G is not cheap.

      Every next day updates are released, using 3G/4G for downloading all internet content is costly affair for sure. Not updating those apps will make you miss those new features and give negative feeling.

      This is where Connectify comes as savior; it allows sharing Internet connection from any source. Let it be LAN, 3G/4G Dongle or even another Wi-Fi Connection.  If you share LAN based internet connection over Wi-Fi, Licensing cost of Connectify is justified in just few months.

      Great features of Connectify which I use.

      1.       Create secure Wi-Fi Access Point based on WPA2.
      2.       Share existing Internet connection with multiple devices.
      3.       Control  level of Access LAN/Internet/Both
      4.       Check traffic and utilization per client.
      5.       Block client if required.
      6.       Share files directly with colleagues having Connectify.
      7.       Load balance internet traffic if you have multiple internet connection.
      8.       It works across Windows 7/8/8.1/10.

      Only prerequisite is that you should Wi-Fi connection, which today every Laptop Comes with.

      Free version of Connectify with limited set features is available for download. Go give it a try, and buy if it fulfills your requirement.


      Friday, October 18, 2013

      SRM Replication Exact Status Check

      SRM Replication Exact Status Check


      Sometimes it is required to check exact replication status of VM. It becomes more important when incremental/delta replication is happening, because graphical interface doesn't show replication status.

      Steps 1 – Check owner Host name for given VM from Summary TAB of vCenter.
      Step 2 – Start SSH service on Host from Security Profile inside Host Configuration and Software.
      Step 3 – Login to ESX host using proper login ID and password
      Step 4 – Execute below given command to list all VMs, and note down the VMid for your VM.
      # vim-cmd vmsvc/getallvms
      Step 5 – Execute below given command to check exact replication status
      # vim-cmd hbrsvc/vmreplica.getState 13
      Step 6 – Execute below given command to check data transfer status.
      # vim-cmd hbrsvc/vmreplica.queryReplicationState 13


      Thanks

      Thursday, October 17, 2013

      Active Directory Bulk User Creation

      Install the Active Directory Module for Windows PowerShell on a Member Server
      1.       Log into a Windows 2008 R2 (or above) member server
      2.       Launch PowerShell
      3.       Enter Import-Module ServerManager 
      4.       Enter Add-WindowsFeature RSAT-AD-PowerShell
      5.       Enter Set-ExecutionPolicy Unrestricted
      Install/Configure Active Directory User Creation Tool
      1.       Log into a Windows 2008 R2 (or above) member server or a Windows 7 (or above) workstation
      2.       Download the Active Directory User Creation Tool
      3.       Right-click the downloaded file (ANUC.ps1) and choose Run With PowerShell
      4.       When prompted, click Yes to create a new .XML file and click OK
      5.       Edit the .XML file that appears, changing the  value to False
      6.       Save and closet the .XML file
      7.       Right-click ANUC.ps1 and choose Run With PowerShell
      8.       Click File –> Create CSV Template and save the file as ImportUsersIntoAD.csv
      9.       From a computer that has a .csv editor installed, edit ImportUsersIntoAD.csv
      10.   Populate the user attributes, using the Windows Attributes Guide for reference and save changes   **The sAMAccountName and Password fields MUST be populated for the users will not be created
      11.   Right-click ANUC.ps1 and choose Run With PowerShell
      12.   Click File –> CSV Mode
      13.   Click Import CSV, browse to the ImportUsersIntoAD.csv file and click Open 

      14.   Click Submit All

      Saturday, October 12, 2013

      Extending Disk of Virtual Machine Enabled for Vsphere Replication


      Extending Disk of Virtual Machine 
      Enabled for vSphere Replication
      1.  Identify disk number which need to be extended. 
      2. Disable sphere replication for that particular disk.
      3. Edit Virutal Machine and extend the disk space as per requirement. 
      4. Note down the new size of disk e.g. 70G
      5. Login to ESX host at DR site using SSH (SSH has to be enabled.) 
      6. Locate virtual disk need to be extended inside respective datastore.
      7. Use this command to extend disk space.
        # vmkfstools -X 70G test-vm_1.vmdk
      8. Re-Enable replication and click yes when asked whether to existing disk.
      9. It will take some time for checksum and replication to complete.
      Email : chandanji@gmail.com


      Sunday, September 15, 2013

      Exchange 2010 memory Capping

      Exchange 2010 memory Capping

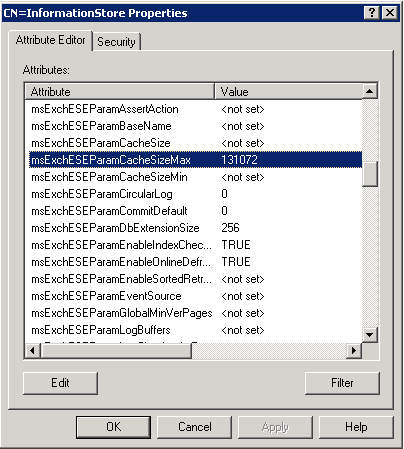
      You will have tough time if exchange servers has high memory utilization. In exchange 2010 you have to modify both msExchESEParamCacheSizeMax and msExchESEParamCacheSizeMin value to get it working. Really that is the trick!!!


      Update Note :- msExchESEParamCacheSizeMax effective effective only when msExchESEParamCacheSizeMin value is also configured. And Exchange Server 
      restart is required after changes.

      First of let us do calculation 

      Exchange 2010: 4 GB = 4.194.304 KB / 32 KB => 131072

      Define Min and Max Value 

      Min – 1GB: msExchESEParamCacheSizeMin = 32768
      Max – 4GB: msExchESEParamCacheSizeMax = 131072
      You must adjust above given values to suit your server environment. 

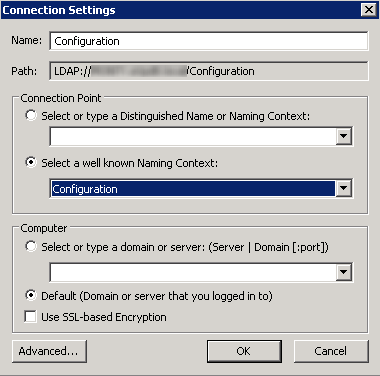
      Start -> ADSIedit.msc, or navigate to Start -> All Programs -> Administrative Tools -> ADSI Edit.

      ADSI Edit -> Connect To

      Then go to Configuration -> Services -> Microsoft Exchange -> ”Organization Name” -> Administrative Groups > ”Administrative Group” -> Servers -> ”Server Name” -> InformationStore


      Then restart Information Store Service or restart exchange server if possible.